ASP.NET

ASP.NET Bundling and Minification Gotcha #1 – Javascript bundle not rendering

ASP.NET Logo

Having used a couple of other bundling and minification libraries like Cassette and RequestReduce in the past, I started playing with the new bundling and minification features in ASP.NET 4.5. While setting up bundles is easy, there are quite a few gotchas that are not yet fully documented on the web.

This specific situation/gotcha took me a couple of hours to figure out, and I almost gave up on using Microsoft’s bundling completely.

In order to ease debugging for us developers, bundling and minification only happens if one of the following conditions are met:

1. You’re running with <compilation debug=”false”> on web.config (or without the attribute at all)
2. You force Bundle Optimizations to be ON by specifiying BundleTable.EnableOptimizations = true; on the RegisterBundles method.

When you’re running in debug mode, the files specified on bundles will not be minified or bundled, and tags will be rendered for each file in the bundle.

While that is great, the problem is the way Microsoft assumed that all developers have both development and release versions of each script that they use. As in, if you’re using jQuery, and you want to add jQuery to a bundle, Microsoft will expect you to have both the jQuery-1.8.0.js and the jQuery-1.8.0.min.js files added to your solution.

If you only have the .min.js file in your project, you configure your bundle to use that already-minified script, and you’re running in debug mode, any .min sripts will not be rendered in debug mode. What’s worse, if you only had .min.js scripts in that bundle, nothing will be rendered for it, as if it did not exist or was not configured, nada. No HTML tag for it.

Why?

Because as this StackOverflow question’s accepted answer states, there is a default ignore list that is enforced when rendering the bundle, and for debug mode, all *.intellisense.js, *-vsdoc.js, *.debug.js, *.min.js and *.min.css files are completely excluded from being rendered, because again, Microsoft assumed that you have both release and debugging versions of the scripts or stylesheets that you use in your project.

To be fair, the official tutorial on ASP.NET Bundling and Minification, does mention of some of the conventions, but it can be confusing. The post states:

“Selecting the non “.min” version for debug.”

“Selecting” implies you have choices. If a project only has release (.min.js) versions of a script, they are not added. If they had two choices, but one of the choices is not even an option in the situation, they should default to the other option, not to ignore the script. The post should have stated

“Only non .min versions are included for debug”

Their intention is good, but I believe the assumption/implementation is a bit flawed. I feel if they’re going to ignore a file that you explicitely specified in your bundle configuration, they should at least check for existance of the debug version of the script in your project before ignoring your request to add the release version to the bundle.

So, in order for your bundle to render those .min.js scripts, you have two choices.

1. Just add the debug version of the script you want to use to your project.
2. Clear the ignore list of the bundle (or just the entry you do not want ignored), although there might be side effects to that if you have other scripts of which you do have both versions.

Hope this saves someone a headache.

Como eliminar la excepcion ThreadAbortException al navegar entre paginas en ASP.NET

Llevo casi 10 años trabajando con ASP.NET y me sorprendi al aprender que cada vez que se ejecuta el comando Response.Redirect(url) en ASP.NET (para navegar hacia otra pagina), el framework lanza intencionalmente una excepcion de tipo ThreadAbortException, con el unico objetivo de terminar absolutamente la ejecucion del request actual.

Como mencione, esto es intencional por parte del framework, y el articulo “Correct use of System.Web.HttpResponse.Redirect” de Thomas Marquardt explica las razones de este diseño.

Para observar esto, solo se necesita correr una aplicacion de ASP.NET en Debug Mode, y ejecutar una linea de Response.Redirect(“Default.aspx”), y observar la ventana de Output en Visual Studio; se vera lo siguiente:

A first chance exception of type ‘System.Threading.ThreadAbortException’ occurred in mscorlib.dll

An exception of type ‘System.Threading.ThreadAbortException’ occurred in mscorlib.dll but was not handled in user code 

Como la mayoria de los desarrolladores debe saber, esto es un problema porque uno de los principales lineamientos de performance en .NET es “No utilizar Exceptions para controlar el flujo de la aplicacion“. Si esto sucede en una aplicacion web con mucho trafico, el lanzar exceptions cada vez que un usuario navega de una pagina a otra, eventualmente va a afectar el desempeño de la aplicacion.

En fin, la solucion para esto es sencilla, pero hay un detalle importante que hay que tomar en cuenta. Como el articulo de Thomas M. indica, se debe de utilizar el siguiente codigo:

Response.Redirect("Target.aspx", false);

HttpContext.Current.ApplicationInstance.CompleteRequest();

Es decir, utilizamos el overload de Response.Redirect pasando false al parametro de endResponse(para evitar que el .NET framework haga la llamada interna a Response.End(), y al final indicamos que deseamos completar/finalizar el request.

El detalle importante que hay que considerar si deseamos utilizar esta manera de redireccionar para evitar la excepcion es que antes, la llamada interna a Response.End() hacia que cualquier codigo que estuviera despues de la llamada original a Response.Redirect() ya no se ejecute, y esto es algo a lo que inconscientemente muchos desarrolladores nos acostumbramos. No es nada raro ver codigo de este tipo en aplicaciones de ASP.NET:


if (!User.HasAccess()) Response.Redirect("GetOut.aspx");

SinceUserHasAccessDoThis();

Si lo hacemos de la manera nueva, pasando el overload con false, cualquier codigo en el metodo que este despues del Response.Redirect si se ejecutara.

Esto es porque era la llamada interna a Response.End() (que ahora estamos evitando) que terminaba la ejecucion del codigo. Como ahora estamos evitando esa llamada, la funcion SinceUserHasAccessDoThis() si se ejecutaria, a pesar de que el usuario no tuviera el acceso que se verifica en el metodo HasAccess().

Aparte de lograr evitar esas excepciones, aprendi que tambien es incorrecto utilizar Response.Redirect para controlar el flujo de la aplicacion, y al menos yo lo hacia inconscientemente. Si se desea evitar esas Exceptions y no se tiene el tiempo para hacer un refactor del codigo para estructurarlo correctamente, se puede arreglar utilizando un return; despues del Response.Redirect, de esta manera:


if (!User.HasAccess())
{
    Response.Redirect("GetOut.aspx", false);
    HttpContext.Current.ApplicationInstance.CompleteRequest();
    return;
}

SinceUserHasAccessDoThis();

Paginas de referencia

  1. Response.Redirect causes System.Threading.ThreadAbortException
  2. Correct use of System.Web.HttpResponse.Redirect
  3. Microsoft Support: PRB: ThreadAbortException Occurs If You Use Response.End, Response.Redirect, or Server.Transfer
  4. HttpApplication.CompleteRequest Method
  5. Is Response.End() considered harmful?
  6. Rick Strahl – Ending a Response without Response.End() Exceptions?

Espero les sirva.

Curso de ASP.NET MVC 3 de Pluralsight gratis gracias a Microsoft

Scott Guthrie simplemente sigue produciendo cosas geniales…

Hace unos días, Scott anunció que Microsoft logró un acuerdo con Pluralsight para que abrieran de forma gratuita su curso en linea de ASP.NET MVC 3, pero solo hasta Marzo 18.

El curso sobre los siguientes temas principalmente:

  • Introducción a ASP.NET MVC 3
  • Razor View Engine (ya no se siente mas el spaguetti-code feeling)
  • Controllers
  • Models
  • NuGet (so cool)
  • Dependency Resolucion

Aprovechen y vean el curso. Llevo poco aprendiendo ASP.NET MVC pero ya me gusta suficiente como para dejar WebForms…

Espero les sirva.

Liga: Curso de ASP.NET MVC 3 gratis

Extensiones de Visual Studio para funcionalidad agregada

Visual Studio 2010 Logo

A pesar de estar utilizando Visual Studio 2010 por ya casi un año, fue hasta apenas este fin de semana pasado que descubrí el sistema de Extensiones de Visual Studio 2010.

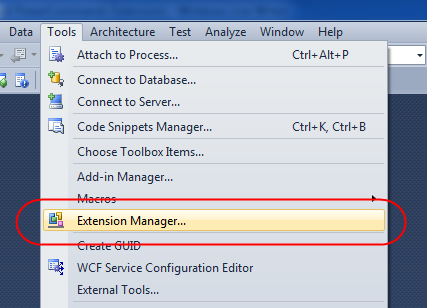
El “Extension Manager” es la manera en que Microsoft permite extender y mejorar Visual Studio, a través de plugins, add-ins, macros, templates y más (a las que ahora se refieren solamente como “extensiones“), pero de una manera centralizada y estandarizada.

Visual Studio Extension Manager Tool Menu

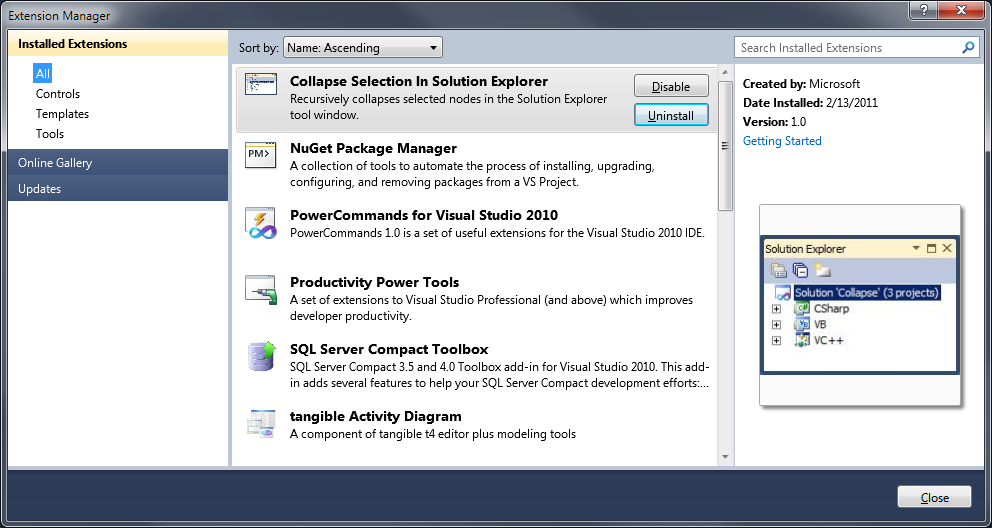
Antes, si alguien aprovechaba algún plugin para Visual Studio, era porque se lo había topado en alguna página, blog, revista o recomendado por alguien más, y ya no es así. Microsoft creó la Visual Studio Gallery, que es un repositorio centralizado de Extensiones de Visual Studio, y que podemos navegar tanto con un browser, como directamente dentro del Extension Manager de Visual Studio. El Extension Manager se ve así:

Visual Studio 2010 Extension Manager

La interfaz visual es muy buena, y la funcionalidad es todavía mejor. Desde la ventana única del Extension Manager podemos instalar nuevas extensiones, visualizar todas las extensiones que tenemos instaladas, filtrarlas por categoría (Controles, Templates, Tools), deshabilitar o desinstalar extensiones individualmente, y hasta actualizar las extensiones. Eso significa ahorrarse el trabajo de ir a la página web de cada desarrollador de las extensiones que tengamos instaladas, bajar un ejecutable para actualizar la extensión, etc.

El Extension Manager de Visual Studio 2010 aprovecha que Microsoft diseñó Visual Studio e integró MEF (Managed Extensibility Framework), que es un framework público (y Open Source) ofrecido por Microsoft para que los desarrolladores de software puedan diseñar sus aplicaciones considerando puntos de extensión, pero eso es otro post.

El hecho de haber descubierto esta funcionalidad de Visual Studio, hizo que me pasara unas 2 horas buscando extensiones útiles, las cuales iré recomendado y describiendo en posts futuros, pero la primera que les dejo es una que provee una de las funcionalidades que más utilizo de ReSharper: Ctrl + Click para ir a la definición de un Type. La extensión se llama “Go To Definition“, y fue creada por Noah Richards.

Espero les sirva y aprovechen esta excelente funcionalidad e de Visual Studio.

1 2  Scroll to top