Tips

How to activate a Windows 8 clean install with a Windows 8 upgrade key

I’ve always hated how most products (if not all) force you to install an older version of a product if you have an upgrade product key for it, and not just allow you to do a clean install and simply use your upgrade product key.

I was on Twitter yesterday and Jon Skeet had been able to do a clean install of Windows 8, but has having trouble activating the product online, getting the following error:

“The Software Licensing Service determined that this specified product key can only be used for upgrading, not for clean installation”

One of his followers pointed to a page that contained the steps to work-around the clean install activation crippling. The steps are:

  1. Open the Registry (Windows + R –> regedit –> Enter)
  2. Go to HKEY_LOCAL_MACHINE/Software/Microsoft/Windows/CurrentVersion/Setup/OOBE/
  3. Change the value of MediaBootInstall from 1 to 0.
  4. Open a Command window as Administrator (Windows + Q –> cmd –> Right Click –> Run As Administrator)
  5. Type: slmgr /rearm and hit Enter
  6. Reboot
  7. Run the activation utility again. You should be able to use your upgrade Product Key.

I got the steps from GHacks: Windows 8 Upgrade: clean install possible?

Give your Microsoft Ergonomic Keyboard 4000 Previous/Next song functionality

This post shows how to “hack” your Microsoft Ergonomic Keyboard 4000 to give Previous/Next functionality to the numeric “Favorite” keys (specifically the 4 and 5 numbers) although you can probably use this to set Previous/Next to any of the custom keys.

These will not be application-specific but system wide, which is the beauty of it. You don’t have to switch to your music player application in order to change the track. So far I’ve tried it with Spotify and iTunes, and it works.

Here are some things that are useful to know when you do this:

  1. The Microsoft Mouse and Keyboard center uses the registry to store/retrieve the assigned target program or commands to each of the special keys. The path on the registry is at HKEY_CURRENT_USER\Software\Microsoft\IntelliType Pro\ModelSpecific\1016\EventMapping.
  2. Given that the registry is used, it is possible that for 64 bit installs there are duplicate entries on the usual SOFTWARE path and on the Wow6432 node. I bumped into that the first time I tried this. The tutorial that showed me how to do it was only for a 32 bit Windows install, so I didn’t know I had to look for the 64 bit entry at that time. This second time I did it, I’m on a Windows 8 x64, and I didn’t have to anything else other than to edit the default registry path. When I did this on Windows 7, I did have to alter the entries on the Wow6432 node.
  3. Each key has a corresponding registry Key/folder, and inside, a REG_DWORD (32 bit) entry has the actual command to execute for that key.

So, the actual steps to do this:

  1. Open the Microsoft Mouse and Keyboard Center.
  2. Go and assign custom targets for the keys that you want to you use for Prev / Next. I use #4 for Prev, so I set #4 to prev1.exe (the file does not have to exist, just makes it easier to find the key you need to edit on the registry) and I set #5 to next1.exe.
  3. Open Task Manager and kill the itype.exe process.
  4. Open the Registry, with Administrator privileges.
  5. Edit -> Find -> prev1.exe
  6. Just one registry entry should be found. Inside there will be about 4 or 5 entries. Delete all of those, it will not let you delete the default one.
  7. In that spot, create a new DWORD (32 bit) Value, make sure Hexadecimal is selected on the radiobutton, and paste the following text to its value: 000002c0. Rename the entry to “Command” (without the quotes) or it will not work.
  8. Now do the search for next1.exe, and repeat the procedure but assigning the new entry the value of 000002bf.
  9. Manually start itype.exe (location of default install is at C:\Program Files\Microsoft Mouse and Keyboard Center\itype.exe).

You should now have Previous/Next functionality on the keys that you selected. Hope it works.

Thanks to Tom from ElectroLab Games, which is where I saw the original tutorial: Microsoft Ergonomic Keyboard 4000 + Play Next Song Hack

Quick shortcut to reset page zoom in Chrome

I’m having some trouble with my external mouse and Google Chrome. The zoom functionality available by holding the CTRL key and scrolling the mouse wheel is working in extreme increments.

The slightest scroll of the wheel will either max the zoom out to 1000% or reduce it to 10% if I have the CTRL key held down. I haven’t been able to find the reason, but I just learned that hitting CTRL + 0 defaults the zoom to 100% (or whatever your default zoom is, in Chrome Settings). Great tip!

How to fix Google Drive error c24e where the sync button does not work or do anything

I upgraded one of my computers to Windows 8 today, and when I installed Google Drive and chose a custom setup configuration to only sync some of my folders, I got some weird behavior from Google Drive.

After selecting all the configuration options (leaving the default folder as it is), clicking the Start Sync (or Sync) button wouldn’t do anything at all. No feedback, no error message, no alert, no event viewer message, nothing. I waited for a few minutes, tried again, nothing. I uninstalled Google Drive, tried again, nothing.

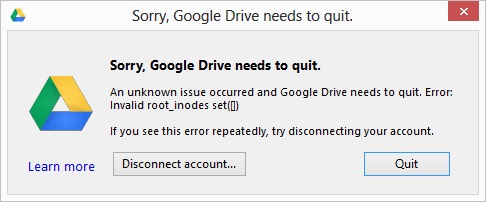
After a few minutes, I got an alert box that just mentioned error c24e, and a few more tries gave a different error: An unknown issue occurred and Google Drive needs to quit. Error: Invalid root_inodes set.

A few minutes of google searches, and found a very long Google Products Forum post about a lot of people having this very same error.

Apparently, one of the possible causes of this error is having two accounts with the same username (one local, one domain), which I had. The error has to do with folder permissions, more specifically, the account the user is logged on not having access to the created Google Drive folder by the installer, which is weird, since I installed with that user. I even tried to give my account full access to the folder, but that did not work.

Anyways, the fix is simple:

  1. Uninstall Google Drive
  2. Manually delete the Google Drive folder from your computer.
  3. Manually create a folder with the same name (after creating, confirm your logged in account has full access to the folder).
  4. Install Google Drive
  5. Success.

It worked for me. Another possible solution could be to just to use a different folder from the default one.

Hope it helps.

1 2 3 5  Scroll to top